Tuesday, January 31, 2012

Valentine Topiary


Have you ever started on a project with one thing in mind and ended up with something totally different when you were done?  Well this little topiary of mine started out as a decorative ball.  I was going to make a bunch of them and put them in a vase, but then the idea of a topiary came to mind.  So here it is:


I used the cricut cartridge "Straight from the nest" to create the flowers.  If you don't have that cricut cartridge, you could use a flower punch.


To create this topiary:
Styrofoam ball, wooden rod, cotton, tulle, flower pot, white pearl headed pins, flower pot foam

1. Paint your styrofoam ball the same color you plan to make your flowers
2. Punch out all the flowers or use Cricut Cartridge Straight from the Nest flower at 1.0 in.
3. Use pins and poke holes in the flowers
4. Once the paint is dry put flowers and pins in the styrofoam ball
5.Paint rod and flower pot to desired color.
6. Cut rod to height preference
7. Stick rod into styrofoam ball, make sure to hot glue rod and then stick it in
8. Place rod into potting foam (sorry I know it's not the technical term, but the floral foam you use for fake flowers..it's green...) and place it into pot.
9. Place cotton on top of flower foam....I actually used polyfil because that is what I had on hand.
10. Cover with tulle. I hot glued the tulle around the pot.
11. Enjoy!


***This just in......this project was featured on Lil Luna, Decorate to Celebrate, and My Craft Spot!***


Happy Crafting Everyone,

Smiles, 

Jill

Linking up to

Monday, January 30, 2012

A day late and a dollar short


Today I went to enter my "Rosette" project into The Paper Variety's Challenge. I soon realized I was a day late and a dollar short...isn't that how the phrase goes?  Anyways, I still wanted to share with you my project because I think it is fun and you could potentially use it as a Valentine decoration if you wanted.


 All I did was take a Jones Soda ....if you can't tell I'm obsessed with Jones Soda a bit...here's another project I made..now I don't drink pop all the time but if I'm going to I want a Jones!..Anyways, you could take any bottle..I actually wrapped that bottle with macrame yarn (if that is what it's called, forgive me for not knowing the technical term) You may wonder what I'm doing with a huge ream of Macrame yarn...well, my in-laws were helping my grandma in-law clean out her garage and they said "You're crafty. I bet you could find some way to use this HUGE ream of yarn!" So I did!  You could use regular yarn if you don't have a HUGE ream of macrame yarn lying around! ha!  I just hot glued it at the bottom and wound it around and hot glued along as I went.

Once I was all done my project looked like this:


I didn't like the looks of it and thought it needed a little bling! So, I added a rosette.  The tutorial I followed was Creations with Christina's.   Here's a close up:


Here it is altogether! Happy little flower in it's happy little vase!


Hope you're having a super day!
Happy Crafting
Smiles, 
Jill


Linking up to
tatertots and Jello
30 handmade days
Paper Issues
Lil Luna

Sunday, January 29, 2012

Sundays are Lovely #5


What is a link party?  A link party is a place to share your crafts and to get ideas! How do you enter your project? Go to the very bottom and click on the little blue button.  Then all you have to do is follow the directions from there.  It's a fun way to check out other blogs, so I really hope you will join me! I enjoy looking at everyone's projects and I hope you take the time to look too:)

Now you can link up ANY project...new or old!  For example, if there is a project that you did last year for Valentine's Day and want to show it off...by all means go ahead! It doesn't have to be Valentine's though, that was just an example. You can also link up as many projects as you like!

The most viewed project this week was

Holly's! Way to go, girl!


Don't forget to add a link or my button to your post!

Happy Crafting!
Smiles,

Jill

Saturday, January 28, 2012

Valentine Wreath


My door needed some "LOVE"! So, I made this little wreath for it!


A big 'Thank You' goes out to Whisker Graphics because that is where I got the XO banner. The burlap was from Michaels.  The wreath was from The Dollar Tree.  The red and white polka dot ribbon is leftover ribbon from a bow I made for my daughter..I believe it's from Hobby Lobby.  The fabric for the flowers is from an old shirt. The pearls are just leftover from some earrings I made.  So this wreath was super cheap to make but I think cute for the door.  What do you think?  If  you want a tutorial for the flowers you can find that here.

Thanks for taking a peek at my new "LOVELY" wreath!

Happy Crafting!

Smiles,

Jill
linking up to
3o handmade days
 I heart naptime
Decorate to Celebrate
Be Different Act Normal
Tatertots and Jello
The Girl Creative
Lil Luna
An Original Belle
It's Overflowing

Friday, January 27, 2012

Cartridge Showcase


Don't forget to link up any project new or old to my link party.
♥♥♥♥♥♥♥♥♥♥♥♥♥♥♥♥♥♥♥♥♥♥♥♥♥♥♥♥♥♥♥♥♥♥♥♥♥♥♥♥♥♥♥♥

I did a cartridge showcase over at Cooking with Cricut. Just in case you missed it...Here it is:

Hi everyone!  My name is Jill and I'm from Jaihart just lovely designs. Today, I'm going to try to do my favorite cartridge justice and showcase it! Straight from the Nest is a cartridge I own because Christina from Creations with Christina had a giveaway and I won!  This cartridge is my favorite because of the versatility of it.  There are sayings, corners, images, borders, and layers!  What a great cartridge!

Here are the projects I came up with:


This is a birthday card I made for my friend.
The chickens are the border option on straight from the nest.
You can check it out on my blog here.

Here is a topiary I made using the little flowers from Straight from the nest.

This is a card I made for my husband, but the cool thing about this card is that instead
of using paper as my card base, I used a transparency!  The shape behind the eyeball is
from Straight from the Nest.

The "Fall" is a corner feature in this cartridge but I blew it up and used it in this sign I made for my home.
You can check it out on my blog here.
Here is a Christmas Card book I made.  The green border is from Straight from the Nest.
You can check it out on my blog here.
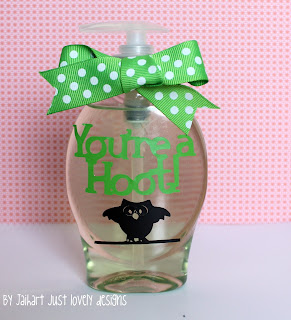
This is a gift I made for my friend.
The owl is actually a corner option, but I cut off the sides so the owl would fit.
You can check it out at my blog here.


Thanks so much for checking out my showcase! Like I said...this cartridge is amazing!


Smiles,


Jill


Thursday, January 26, 2012

I heart U


Don't forget to join my link party! Link up new and old projects!
♥♥♥♥♥♥♥♥♥♥♥♥♥♥♥♥♥♥♥♥♥♥♥♥♥♥♥♥♥♥♥♥♥♥♥♥♥♥♥♥♥♥♥♥♥♥♥
Today I'm showcasing my favorite cartridge!
I would just love it if you would go check it out at Cooking with Cricut
♥♥♥♥♥♥♥♥♥♥♥♥♥♥♥♥♥♥♥♥♥♥♥♥♥♥♥♥♥♥♥♥♥♥♥♥♥♥♥♥♥♥♥♥♥♥♥♥♥♥♥♥♥♥♥♥
Onto a new card I wanted to share with you...this card was so fun to make! It was the first card I've ever made using a transparency sheet!  I just went to Office Depot's customer service. I bought a transparency sheet for 50 cents.  I came home and cut it and scored it to the size I wanted. I enjoy this card because of it's "transparent" look.  The inside of the card shows through the front! Does that make sense? So the brown cardstock is actually on the inside of the card but you can see it through the front! So fun! I love it! This is another card I'm going to give to my husband. His birthday and Valentine's day are so close together I'm having a hard time choosing which card to give on which day.

So I have this card


and then  remember this one. What do you think...which card for which holiday....?


Hope you are having a great day!

Happy Crafting,

Jill

I used "straight from the nest" for the image behind the eye (1.5)
Plaintin school for the heart (2.0) and life is a beach for the "u" (1.5)

Linked up to
Pink Cricut

Wednesday, January 25, 2012

O-"Fish"-AL Valentines


This week at Cooking with Cricut the Challenge is tough! I guess that is why they call it a challenge! I struggled with this one at first. I know you will do a great job with the challenge though! You must have yellow, polkadots, and anything but a card for your project! Then Link your project back to cooking with cricut. So this is what I came up with....


Anyone else loving Pinterest? I absolutely do! I must admit that it took me like 3 months to decide whether or not to start following it.  I was a little intimidated I must say.  But after I figured it out.  I LOVE it! While searching on Pinterest, like I do, for ever, I found this idea to use goldfish crackers using the word "O-Fish-ally". I knew I had to use it because my son loves goldfish crackers.  So, I created some Valentines for my son to give to his preschool class.


Want to make some?

Tuesday, January 24, 2012

Our son the Snowman


I wanted to share a crafty gift my son gave us for Christmas...I know a little late, but it's still winter so you have some time to still make it if you want!  He made it at preschool!  We are so proud of him!  He even wrapped it himself!  Now you may look at this and think "Oh it's just a paper snowman with glitter on it"....which is what it looks like, but the teachers did a great job and placed a clothespin with a magnet on the back!  Now we can hang up his artwork he brings home on the fridge!  My husband and I love this little magnet clip! Great idea!

I hope you're having a great day!
Happy Crafting!

Smiles, 
Jill

Linking up to

Link Party


Sunday, January 22, 2012

Sundays are Lovely #4


My Blog Candy Winner is MICHELLE! CONGRATS MICHELLE! You are the new owner of  the Wild Card Cartridge! Yay!
---------------------------------------------

Hi everyone! I hope you had a super awesome week and weekend!  I'm so happy to say that we now have Thumbnails/pictures again for Sundays are Lovely at Jaihart!  I like being able to look at your pretty projects better than just a link!

This weeks feature is


Congrats Heather! I love the little brads in the upper lefthand corner! Heather creates some amazing layouts! You should go check out her blog!
Heather, grab a feature button!

Now onto the party! FYI...this is a week long party...it just starts on Sunday!
Remember the only rule is that you must link your project back here!
You can grab a button or just use a link!

http://jaihartjustlovelydesigns.blogspot.com

Smiles,


Friday, January 20, 2012

Fabulous Feature at Getting Cricky with K. Andrew

FYI...I'm having a link party!  Check it out!

---------------------------------------------

Just in case you didn't get a chance to view my feature as a guest designer here it is...................


Hello Getting Cricky with K Andrew fans!  My name is Jill and I'm from J♥ just lovely designs
What an honor to be a guest designer today! K. Andrew stamps are wonderful!  I have the "Amazing You" collection and I use it ALL TIME for the inside of my cards!

Today I'm going to share a birthday card I made for my friend who lives in Spain!  I wanted the card to be whimsical and cheery because that is what I think of when I think of her!


Look at the little chicks, they are so funny!


I just love them!


Like I said I love using the "Amazing You" collection for the inside and here it is!


Thank you so much for taking a peek at my birthday card design!  I hope you will stop by and visit me sometime at J♥ Just lovely designs!

Smiles,


Thursday, January 19, 2012

Guest designer

Have you entered my link party, Sundays are Lovely? You can link up ANY project during the week.  The link party closes on Saturday and starts up again on Sunday.  I will feature one project! Good luck:)!

Also, if you have a Challenge Blog, make sure to add your link to my tab!
--------------------------------------------------------------------------------------

Yay! I'm a guest designer over at Getting Cricky with K. Andrew today! Come over and visit me! If you do....  make sure to come back and comment on my blog!  I will enter you into my BLOG CANDY I'm giving away!


Hope you're having a super fun day!

Smiles,


linked up to
Thirty Handmade days

Wednesday, January 18, 2012

"Snow" Body Else like YOU!

If you haven't linked up to my link party, you can do that here. You can link up any project you have been working on! The only rule is that you must link your project back to my link party by either grabbing a button or making a link. I will be featuring one project this Sunday! Good luck!
--------------------------------------------------------------------------


This week at Cooking with Cricut the challenge is a winter warmth theme.
My Nana turned 80 yesterday! Whoo Hoo! So, of course I had to make her a birthday card!

Here it is:


On the inside it says "Snow" Body else like YOU!

I used Celebrations Cartridge for the balloon cut at 1.2


Hope you are able to stay warm!
Thanks for stopping by!

Smiles,


Linking this up with
Getting Cricky
Birthday Sundaes
The Cuttlebug Spot
Little Scrap Pieces
Blue Cricket  -link party
Lil Luna-link party
Thematic Thursday
Fantabulous Cricut
My Craft Spot

Sunday, January 15, 2012

Sundays are Lovely #3


I hope that everyone had a wonderful week!  We sure did!  My husband and I got new computer desks! yay! I  l.O.V.E. them!  Also, it's been super snowy here! My son's preschool was cancelled due to so much snow! Crazy!  What is it like where you live? Sunny, warm, and delightful?!

Well, onto the party...

Saturday, January 14, 2012

My Pink Stamper January Blog Hop Challenge

Love MY PINK STAMPER, Robyn!  What a fun gal!  She's so crafty and such a great teacher!  It's so fun to learn from her!  Anyways, I made a project for the Blog Hop.


Theme for Project: A fresh clean start! Make something for yourself or that you would give someone to welcome the fresh clean start of a New Year! It can be a card, scrapbook page, gift or home decor item. Pretty much anything goes!


Something Old, Something New, Something Borrowed, Something Blue


Welcome to Day One of PaperCraftingWorld.com and CookingWithCricut.com’s first Blog Hop of 2012!  Our theme is:  “Something Old, Something New, Something Borrowed, Something Blue!” 

If you have arrived here from Linda’s blog Linda's Creativity you’re in the right place!  If you’re joining us mid-hop, head on over to see Melin at CookingWithCricut.com and start at the beginning so you don’t miss any of the wonderful projects the Designers have created!

Our Designers had to use something old from their craft stash, something new (a recent purchase or new technique), something borrowed (an element from a Cricut cut or from a PaperCraftingWorld.com cutting file or digi stamp) and of course, something blue.


I L.O.V.E. Christmas Cards! I rush out to the mailbox to see what cards have arrived during the month of December.  

When the Christmas season is over I get so sad to take the Christmas cards down. I normally take them down and file them in a box.   NOT THIS YEAR!  Jamielyn from I heart naptime came up with an idea to put the cards onto an 8 1/2 X 11 piece of paper and then put them in a binder using protective sheets....just what I needed, quick simple, and DONE!  


Here is the cover I designed:


So I went back and  started with 2006.  I have all the cards in the book and I divide the years with a printable I got from eighteen 25's blog . The printable on the cover is the same as the year dividers.


I just have to share a picture of my son in my parents' Christmas card this year.  I think he looks like a child from the show Little Rascals or a Norman Rockwell child.  I can't decide...he cracks me up!


I used:
Something old-Christmas Cards
Something new- laminator
Something borrowed-idea from Jamilyn at I heart naptime and printable from eighteen 25's blog
Something Blue- blue color on printable

The cricut cartridge I used was Straight from the Nest (the green border and the corner shape)


-------BLOG CANDY ALERT!-----------


One special person will be getting the cartridge Wild Card.
All you have to do is leave a comment below! 

Now head on over to Larelyn’s blog, Handmade From My Heart and see what she’s created! 

Make sure you check in tomorrow at CookingWithCricut.com and see what the Day Two Designers have cooked up!  Thanks for stopping by and hopping with us!

Also, check out CWC shop called Papercrafting World. They have cutting files and digital files! There are some very cute designs.

Smiles,


In case you get lost here's the list:


Wednesday, January 11, 2012

Photo Inspiration CWC Challenge


This week's challenge at Cooking with Cricut is to create a project using this photo as your inspiration.  Here's my project:


I used a glass because the water was so smooth it looks like "glass" and the etched letter looks like snow.
 I created the 6 glasses for my brother for his birthday.....shhh.....don't tell! 
 I used the Cricut Cartridge Storybook to create the "stencil" to etch the glass. The letter is cut at 3".

Smiles,

LinkWithin

Related Posts Plugin for WordPress, Blogger...