Monday, April 30, 2012

In LOVE with a light fixture?

I never knew I could be in love with a light fixture, but it seems as though I am! I can't stop staring at it!...probably not too good for my eyes. Well, I guess when it takes 5 years to decide on one, I appreciate it that much more!

Here she is....

5-Jar Chandelier

We got the light fixture from West Elm 


and put the Edison light bulbs inside, which give the light fixture a little different feel.


I attempted to take a picture of it for you..... You can kind of see the zig zags in the light bulbs in this picture.
So, is it too Modern for you?

Have a super day!

SMiles,

Jill

Like me here | Party with me here | Follow me here


Sunday, April 29, 2012

Sundays are Lovely Mother's Day Features


With Mother's Day just around the corner, I wanted to share some fabulous ideas, you could make, that were linked up to my link party, Sundays are Lovely.


Aren't these so fun?! Thanks for linking up ladies!
Grab a feature button on the sidebar!
I'm happy to say that we made our goal of 50+ links! WHOOO HOOO! 
I can't believe it! 
Now I get to go shopping and find something for our next giveaway! 
YAY! I love shopping! 
You can still link up any projects for this month until the last day of the month 
and then we start over friends! 
Any special requests for the giveaway?


Have a LOVELY Sunday!

Smiles, 

Jill

Like me here | Party with me here | Follow me here

Saturday, April 28, 2012

Lilly's Garden Party Invitation


My daughter just had her first birthday! It was so much fun! I wanted to share with you the invitation that I made. I uploaded a photo that I took to Shutterfly and made this card! It was so nice not to have to write out all the party details and plus it was quick and easy! Once the invitation arrived (which was super quick btw's), all I had to do was print out the address labels and stick them on the envelopes! I added Washi tape to the back of the envelopes, which was really fun! That's it!

I loved my daughter's first birthday party! It was my most favorite party I have ever thrown! I will be sharing all the party details soon! YAY! Can't wait!

Smiles,
Jill

5x7 Folded Card
View the entire collection of cards.


Friday, April 27, 2012

CWC Sweet Tooth Boxes Cartridge Showcase Instructions

Hello, everyone! I did a cartridge showcase over at Cooking With Cricut yesterday! The cartridge I showcased was Sweet Tooth Boxes...


I promised that I would give detailed instructions how to make each project. So, here they are.

Here is a cake box I made for my friend's birthday!


Recipe:
Jubilee for Enjoy Flag cut at 1.5
Cake box cut at 10.75
yellow part on the cake was embossed using Cuttlebug Swiss dots
The little decoration on top of the cake was just a 1 inch piece that I cut and then folded accordian style.
I used a glue dot to secure the candle. It didn't hold very well, so I would hot glue it if I had to do it over again.

To create the cake box I just followed the instructions via the Sweet Tooth Boxes handbook.


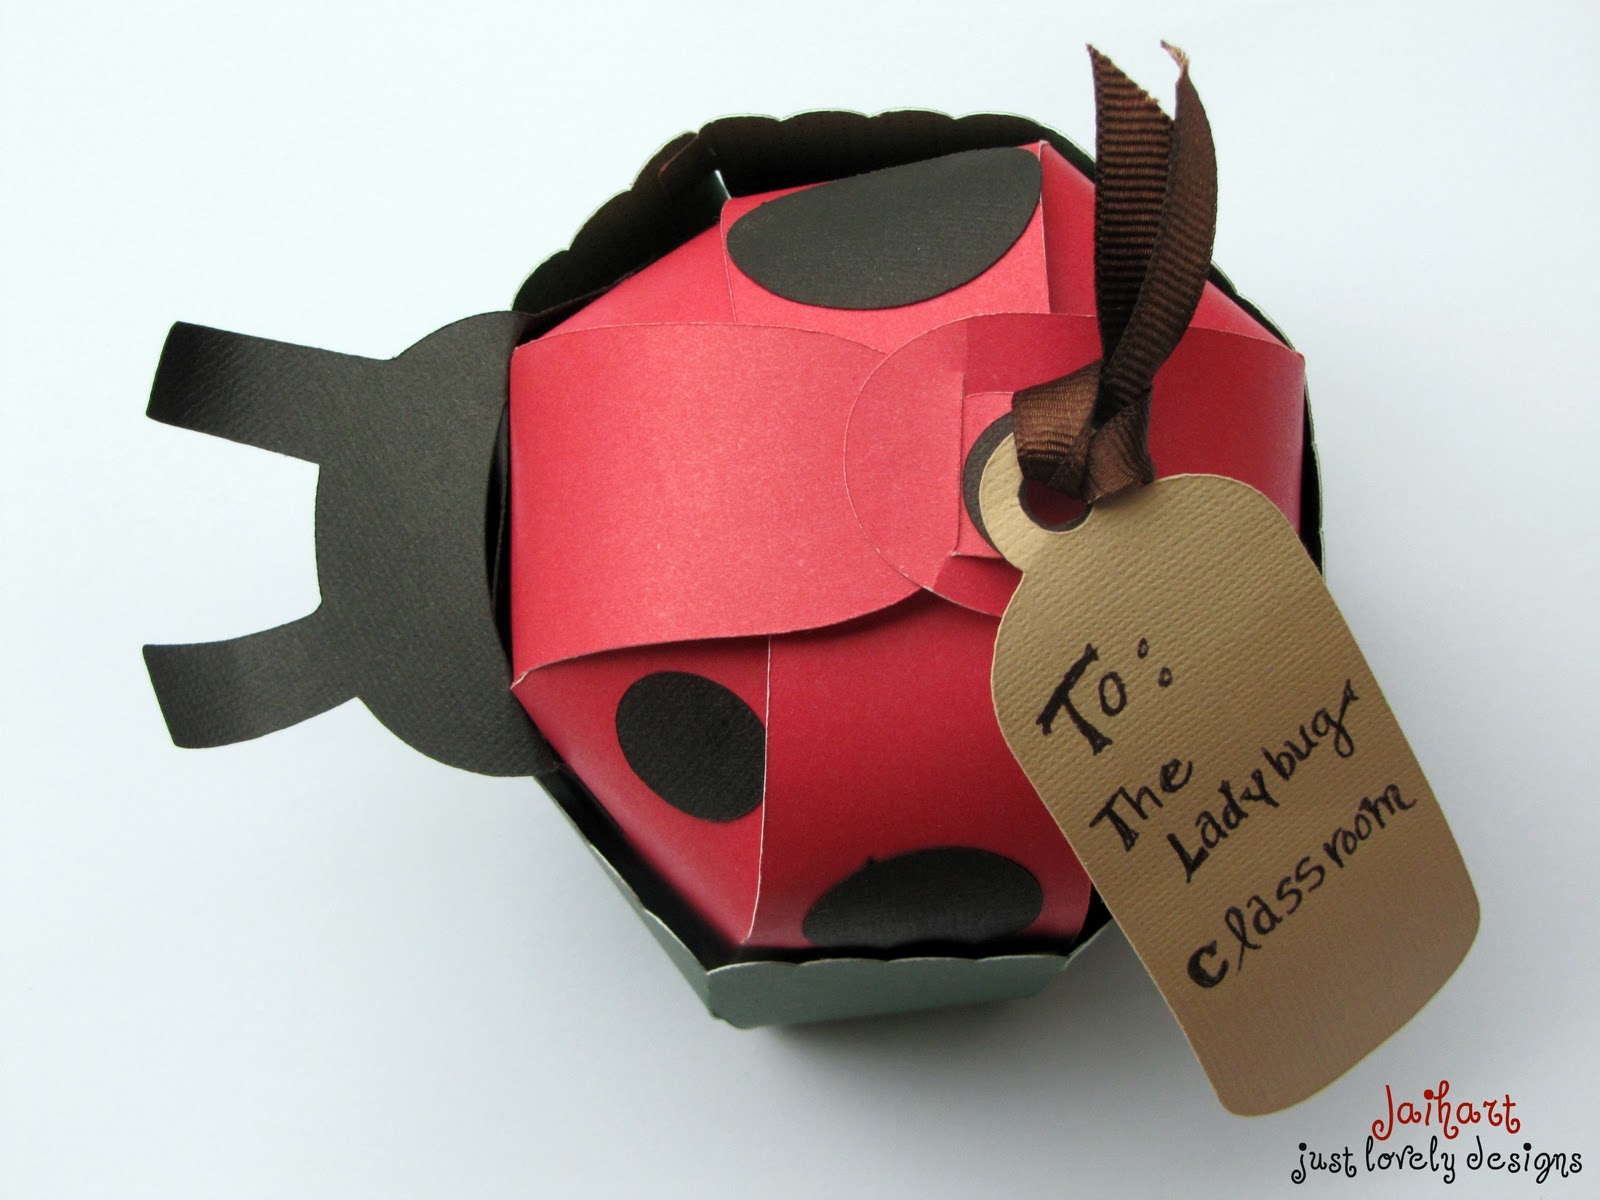
 Here is a ladybug treat container I made for my son's preschool teachers. 
Their classroom is called the ladybug room, so I used the small ice cream dish (9.5) and  
just added the ladybug head from Walk in My Garden and circles from Plantin Schoolbook.


Lastly, I have a treat house I made for my husband's secretary! 
This week at my husband's work they are honoring their secretaries!


I put a cake pop inside the house! Yum!


I cut this house out at 10 in and then just followed the instructions via the handbook.

This cartridge is so fun!
Do you have it?
If so what is your favorite box?
I would love to see your projects you've made with this cartridge!
Comment below with a link to your project and I'll come check it out:)
Thanks for taking the time to check out my 
Sweet Tooth Boxes showcase!
Smiles, 

Jill
Like me here | Party with me here | Follow me here

Thursday, April 26, 2012

CWC Sweet Tooth Boxes Cartridge Showcase

Hello, everyone! I'm doing a cartridge showcase over at Cooking With Cricut today! The cartridge I'm showcasing is Sweet Tooth Boxes...


I would love for you to go check out the boxes I made here:)
I will have detailed instructions tomorrow on how to make each one!
I hope you head over and visit me!
It makes my day when my friends visit me on another blog:)!

Have a Super Day!

Smiles,

Jill

Like me here | Party with me here | Follow me here

Patches of Pink, Anything Baby

Hello everyone! Patches of Pink is having an anything baby link up! My mom, myself, and some friends actually had a baby shower for some friends not too long ago, you can check out all the details here. Today I'm going to share the activity that we did at the shower.


We made onesies at the baby shower! It was a BLAST! The baby shower was kind of like an open house...not regimented, so I was in the basement at the onesies station. People could come and go at the station as they pleased, which people really liked.  At the table we had all different colors of fabric paint, fabric markers, sharpie markers,  sponges,  and paint brushes.


The Sharpie tie dyed onesies were very fun! 
We learned that method from Martha Stewart. 
You can view a video here.

You can buy some onesies to do this project right here!:)


Thanks for stopping by and seeing me today!
I hope you come back!

Smiles, 

Jill

Like me here | Party with me here | Follow me here

Monday, April 23, 2012

Feed the birds


Hello everyone! I have a quick and fun project that you can do with your kids on a boring day!  As I've said before, my son LOVES birds! You may remember the spring activity we did here and the other one here.
I have another bird activity!

First we read this book:


It was very informative with all different types of birds!

Next, we gathered a plastic bag, pinecones, peanut butter, and birdseed....you may have done this as a child. I did this in my classroom before and the kids loved it!

We spread the peanut butter on the pinecone, put birdseed in a plastic baggie, and then put the pinecone in the plastic baggie and shook it!


My daughter was mesmerized by this process!

Lastly, we added a string to the top and hung it on a tree!


So fun! GREAT activity!

Smiles,

Jill

Like me here | Party with me here | Follow me here

Sunday, April 22, 2012

Sundays are Lovely Feature


Look at Natt's SUPER cute card! 
I l.o.v.e. her use of the doily here!
Look at the glitter tape, too!
She has a ton of ideas on how to use glitter tape!
You can go check out more info on her card here.

Come and link your projects up to my giveaway and link party here!
We are 4 entries away from our goal ladies! We can do it!
So excited!

Hope your Sunday is Lovely!

Smiles,

Jill

Like me here | Party with me here | Follow me here

Saturday, April 21, 2012

CWC Home Decor Blog Hop


Welcome to Paper Crafting World and Cooking With Cricut’s Home Décor Blog Hop!  Our Design Teams are so excited to bring you a two-day hop that focuses on projects for your home – that’s right no cards or scrapbook layouts in this hop!  You should have arrived here from visiting Melin at Cooking with Cricut.  If you’ve joined us in mid-Hop and would like to check out all the other fantastic projects head on over Melinda’s Paper Crafting World and start at the beginning.

Since Spring has Sprung, I wanted to share a fun and quick project you could whip up in two seconds for the outside of your house.

House numbers on a flower pot!


 Let's take a closer look...


I just used some brown vinyl on my flower pot! I used the Storybook Cricut Cartridge and cut the numbers out at 2.5!

Here is my front door area all put together to greet guests when they arrive


* a little side note..the "Welcome" on the door is from Uppercase Living...
but all the Cricut and Silhouette lovers could easily make a Welcome sign for the front door too! 
(I got the Welcome sign before I got my cricut...I know what did I do before my Cricut? ha!)

We hope you’ll link up your Home Décor project for a chance at winning one of our giveaways.  One winner will be chosen by random draw and three others will be selected by the Design Team.  Head on over to Cooking With Cricut for the guidelines and the link up. 

I have a giveaway going on! I would love for you to come enter in. You can do that here.

Thanks for stopping by! I hope that you visit again soon!  
Head on over and check out what Jamie at Scrap Queen has cooked up! 
Smiles,
Jill

                                     Like me here |  Party with me here  | Follow me here

Thursday, April 19, 2012

So fun!

I have some very exciting news to tell you...

2 of my cards are published in the May Cricut Magazine! 

I found out in November and I've been dying to tell you all! I want to thank you all for keeping me going! I love each and every email, comment, and pin! I have been an on and off blogger-crafter for the past 2 1/2 years, but most recently have really been able to give it my all! So thank you again for your continued "bloggy love"! :) You guys are the BEST!

So here we go.... my first card I created for my Mother in Law


The second card I created for my cousin....


The magazine is not out in stores yet, but come May you will be able to get it in JoAnn Fabric, Hobby Lobby, Michaels, etc... However the digital copy is available now for $6.95!  hahaha! I felt like a salesperson there for a second....I'm not getting paid for this, but I really just wanted you to know that there is a digital copy available because I didn't realize that until my super friend Holly from Ribbons and Glue..(go say hi to her and tell her I sent you!:) She's the best!) bought the digital copy.

I'm published twice in this magazine! Yipee!

There you have it my friends!
It's still so surreal!

Smiles,

Jill
Like me here |  Party with me here  | Follow me here

Picture Pillow

Just in case you missed my Guest Post at the Craftionary here it is....

                        Today I'm going to share with you a pillow I made for my mom for Easter, but I think that these would be super cute Mother's Day gifts! I took photos of my daughter outside our house....


I was so happy with the way these pictures turned out that I knew I had to do something special with them. I saw a tutorial on how to print on fabric using Freezer Paper here so I thought I'd give it a try.


You will need:
-Fabric
-sewing machine
-printer
-freezer paper (you can get this at your grocery store)
-Polyfill

1. First you will cut two pieces of fabric and a piece of freezer paper to 8 1/2 x 11 in.
2. Next you will iron the freezer paper to the fabric. The shiny side of the freezer paper will be down and you will be ironing the dull side. You won't need to iron that long. You can stop and check to see if the freezer paper is attached.
3. Once the paper is attached you will want to put the fabric and freezer paper in your printer so that you will print on the fabric. The freezer paper is just there so that your printer has something to grab onto...we're actually tricking our printers to think they're printing on paper! I know how sneaky!
4.Next you will make the pillow. I put the two right sides together and sewed around the outside, leaving about a 3 in. gap for me to be able to turn the pillow right sides out.
5. Next you will stuff your pillow will polyfill
6. You will sew your pillow shut.
7. Enjoy!
*This is a decorative pillow and not meant for playing with or using it to sleep on etc...*

Thank you so much for taking the time to check out my picture pillow! I hope to see you soon!

Smiles,

Jill
Like me here |  Party with me here  | Follow me here


Linking up
Lil Luna
I heart Naptime


Wednesday, April 18, 2012

Guest Post at Craftionary


Need a Mother's Day idea? 
I'm guest posting at The Craftionary today!
Come visit me and check out what I did with my baby girl's photo!

Smiles,

Jill

Like me here |  Party with me here  | Follow me here


Tuesday, April 17, 2012

Pink Polka Dot Couples Baby Shower


The Pink Polka Dot Couples Baby Shower turned out to be a success! 
If you're interested in seeing the invitation we chose you can view that here
Here are some pictures! 


                                   Entryway, you can check out how to make the door decoration here


We had the guests write advice for the couple
and estimate how many candies were the baby bottle.


View from the front door.  Pink touches everywhere...tulips, pink and white polka dotted balloons, and my favorite........


.........PINK PILLOWS!


One banner....


another banner...if you would like to print your own banner...I made a printable here.


Ceiling decoration over the dessert table


Dessert Table yummys! 


My lovely readers...do you recognize the candy jars? 
I posted a tutorial here...just in case you're interested

One of my favorites from the night.......                


I loved that even the pasta salad looked girly with the flower shaped pasta noodles...please forgive me for not knowing the specific name! If you know the exact name help me out and comment below:)


We had tons more food, unfortunately I didn't get any more pics:( Since the daddy loves hot dogs we ordered them from a special place in town with all the fixins for a Chicago Dog, we also had beef and turkey sliders, anti pasta platter, fruit, mexican dips, ham pinwheels, black bean dip, the best strawberries in the world,  and I think that is all.....It was such a fun shower and I'm glad everyone had a great time!

If you can believe it, I still have one more post.....but I can't post it yet! Soon soon...


I hope that you have an extra special day!

Smiles, 

Jill

Like me here |  Party with me here  | Follow me here

Linking up with


LinkWithin

Related Posts Plugin for WordPress, Blogger...